The "Audrey Hepburn" coat and a Boston bra making class...
It feels like a long time ago now, but this coat all started in April of this year at a draping class in Baltimore.
I know back then I wrote in general terms about the week but I've had a lot of emails asking for info on how the actual pattern was created, what measurements were used and whether a pattern is available for purchase.
It's fair to say that I struggle with writing more than a general overview of the classes I attend, as morally I feel most of this information is simply not mine to share. I draped my pattern and have used that for my coat but it was all done under the direction of Julien (or Susan or Kenneth ) whose classes I always pay for and for whom this is their life's work.
So, while I don't feel its my place to show muslin schematics, tape placement measurements or draping specific photos/notes in these posts, I will, of course, share how this pattern was created in the broader sense and will, as always, include the more interesting and couture techniques I've used.
I hope you understand :-)
AUDREY HEPBURN DRESS
As I briefly mentioned before, this dress was created as a commission for Japanese designer Yoichi Nagasawa, but was never put into production due to the complicated waist detailing.
and now that I have sewn every single one of those waist triangles together I can truly appreciated why......this is not a one size fits all kind of garment, it needs to be fitted snuggly and precisely to the wearer's exact measurements. A waist that was an inch higher or lower than the garment created would throw off all the drape and detail....
The dress demonstration
One of the things I loved about Julien's draping class was his methodical approach to teaching.
He always started each morning with the line drawing of the next project and the muslin schematic we would need.
From there we would all gather around and watch as he used his black sticky draping tape to mark his dress form following the line drawing while describing the process in exact detail, repeating any stage again and again if any of us needed to clarify a line or a measurement.

When he was sure we had all understood the taped process, he would then start to drape each panel of the garment slowly and precisely stopping for questions and re-draping a section as many times as we needed. Photos and endless notes were always encouraged but video was understandably not allowed.
and when his master piece was complete, off we would go to attempt something vaguely similar on our own forms...
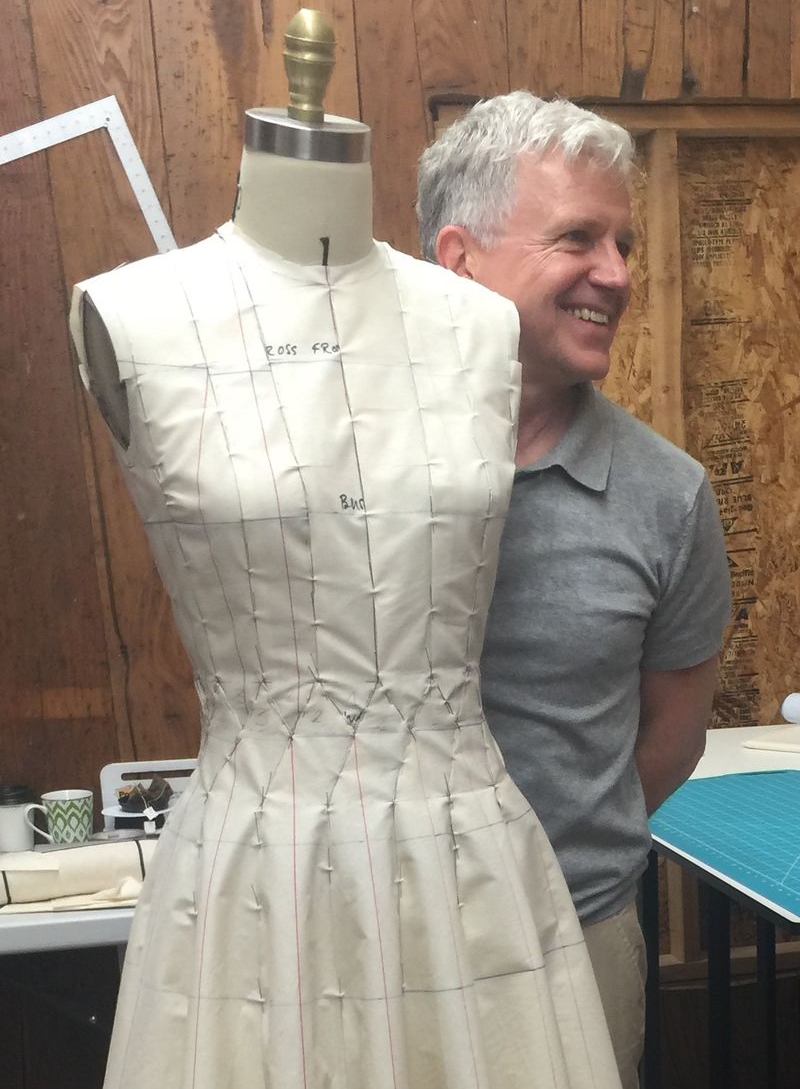
Draping my dress
I started by dividing each section of my dress form's upper and lower body into quarters and then eighths, based on Julien's calculations.
and from there I prepared thirty two individual pieces of muslin, sixteen for the upper and sixteen for the lower body, all marked with my individual measurements and a standard center grainline.
We all started draping the upper body first, and I quickly found that although the design looked complicated and more than a little overwhelming, once it was broken down into sections, it was surprisingly manageable as it was not subjective to the usual flow and ease of a draped garment (which is where I struggle continuously)
I would start each section by placing the center grain line of the muslin on top of the dress form grain line, lining both up and then pining to hold following grains and shape, from there it was as simple as transferring all the taped marks with a series of pencil dots on the muslin to create my working pattern.
and then the same was repeated for the skirt, while keeping the upper body muslin in place so the two could be marked for an exact section fit.
and interestingly (but maybe only to me?! ) while every lower body has to be draped because of the single direction that they flow, the upper body is actually a mirror image and only half a pattern is necessary.
Making the dress into a coat
Turning the pattern into a coat was a little more tricky as the pattern is draped with no ease on the dress form, and I did not know exactly where or how much it would need.
I did briefly think about sewing the actual muslin pattern to try on but the muslin and my final fabric would have behaved so differently that I did not think it would be accurate enough to justify spending the time on it.
I also thought of just adding 1/4" to each panel but when you have sixteen panels 4" of ease is an awful lot for me to wear, even for a coat.
So after some thought, I decided to add 1" to the center front and make the initial coat without additional ease but leave plenty of seam allowances throughout so it could be adjusted as necessary.
I then removed all the muslin pieces from the dress form and cut away all the excess fabric so that I was left with the actual pattern pieces (seam allowances removed)
and then it was on to the fun stuff......fabric!!
While in Baltimore I will often take a ride over to Michaels Fabrics just to looks around. They generally have a quick turnaround of fabrics and it's always a little hit or miss so there are many times when I don't find a thing but thankfully this time I found the perfect one.
A lightweight, non stretch deep navy Wool and Silk Loro Piana at an incredibly good price......and I promptly bought fourteen yards (and Tracey did to, can't wait to see her version!)
As the wool was lightweight I knew it would need a little help as it has to hold all those seams crisply and neatly, so I underlined it with a pure silk Organza.
Cutting the organza was quick and easy thankfully, as it was wide and pieces could be moved around to fit, and only seven yards later.......
As with most wools, mine had a slight nap so everything had to laid out in the same direction which just ate up my fabric yard by yard..
and once the sleeves, collars, facings and button band were added I was at almost 13 yards.
Thread tracing 38 pieces took the best part of a day even with the help of a daughter and husband!
Baltimore
On the first day of class, I pined all the panels onto my dress form in order to make sure that they fitted and were in the correct order...
and then Susan suggested that it was time for some major stitching prep.
As the skirt is angled on both sides, one side needed to be re-enforced and the other clearly marked for an exact sewing pivot.
The re-enforced side was then snipped so it could be sewn accurately and each panel was joined from left to right.
Reducing seam bulk
When faced with a multitude of seam joins, Susan suggested that I reduce seam bulk couture style.
By sewing up to the seam line but not over it and finishing with a little back stitch
Before flipping the seams to the other side and repeating.....
Which is genius because although there is no stitch over the actual seam allowance, it still does secure the seam perfectly which helps keep everything flexible instead of stiff and makes seam trimming quick and easy.
and when you have this many seams intersecting in a garment you need all the help you can get!
ORANGE LINGERIE
When Norma emailed me back in the Spring and asked if I would be interested in joining her inaugural bra making class in early summer, I said yes immediately.
It's something I knew so little about and had been too intimidated to attempt alone, but wanted a deeper understanding of.
Boston is not that far from me, just over two hours.....but it's somewhere we rarely go which is such a shame as it is a great place to visit.
The class was to be held over two days with a Monday start, so my husband and I headed up on the Saturday, ate the most amazing meal at Clio (highly recommend!) and spent the Sunday shopping and enjoying the sights which was such a treat for us before he headed home, and I got ready to learn.
and learn I did, as this was a seriously interesting and well prepared class.
There were three of us in total, Carmen who won the French Sewing Bee, Anne-Marie ... and me :-)
As measurements are just the beginning of a well fitting bra, Norma had us try on a few of her vast made up sample sizes so we could find the most comfortable cup and band, for her to fit us correctly.
It's amazing that an 1/8" will make that much difference but it truly did.....she's that good!!
Day one was all about the white bra which was in essence our muslin.
and while I was skeptical that I could create a whole bra with absolutely no previous experience in just a few hours, I did and I wear it!
On Day 2 we applied all that we had learnt from the previous day and made another bra but in black this time, which not only fits perfectly but has convinced me never to buy another bad fitting bra again!
Two perfectly fitted completely wearable bras, I was so proud of myself!
Now of course I have a list of lace inspired underwear I want to make like:
and this:
Oh the possibilities!!!
I really loved Norma's depth of knowledge about fit and construction and her willingness to share, having a better understanding of bust fit was so interesting and relevant to all of my sewing and honestly it just such a fun and relaxed couple of days......the perfect length of time and with only three of us we all received lots and lots of individual attention.
and as an added bonus to a already great few days, Norma and I met the famous Jenny of Cashmerette for dinner one night which was awesome as I have such admiration for all that she is doing.
and I think Carmen, Anne Marie and I had so much fun that we convinced Norma to do some more......all the info is here
(I paid for my class in full)
So.......more coat sewing this week, in between work. There are lots of new fabrics arriving from Europe and end pieces that need to be put on the site ..
Also a huge thanks to Nel for this link....
and also a big thank you to Cynthia for this lovely Lanvin link. I arrive in Paris about three days after it ends sadly :-(
Have a wonderful week everyone.
Leisa