Marfy sew along 1756 Pt 12 - Collars...Construction and pad stitching
I think there is always a defining step in each garment, a moment where everything has to come together exactly, for it all to work going forward.
In this jacket, today's post is it!
and because this jacket has a fairly unique design, in that the collar is part of the front panel and it includes the lapel ... its a little more confusing that normal.
A traditional collar would be cut with the under collar on bias, a single upper collar on grain, and then pad stitched to help define the stand and support the fabric....
The lapel would be shaped independently of the collar, so it could roll gently away from your body and then the two would be joined together to make the continuous collar shape we are used to seeing.
Obviously this is a little more challenging as we are dealing with something that looks different, but all the normal elements are here, they just have to be found..
So, we've found and taped the roll (break) line...
Now we have to find the portion of the collar that curves outwards..as we will need to pad stitch this section differently...
Again, this will be where you want your collar to stand and where you want it to fold...there is no right or wrong....
The top of the fold line nearest the face is the important mark we need here (purple pin) .....as there is no structure in the muslin, it has folded into the roll line...
The blue line is the muslin mark....the pink is the line I've drawn. I've used the start of the blue line (purple pin) as a guide and angled it so that it does not go through the taped section..
This line will become our starting point for the pad stitching.
In theory, this could be considered a/the roll line instead of or as well as, but I wanted there to be stability and a definite break around my neck/collar bone because this is a big collar that needs some help...
and personally, I think adding tape to this section would cause the whole piece to collapse..but of course, as with all Marfy, its purely personal preference and your interpretation of the pattern.
Also, by keeping this entire section soft, it gives you the option of wearing the collar up or down...
So instead of tape, we are going to use tiny pad stitching to weigh this section down so it falls gracefully..
and if I am honest, while I've second guessed myself a few times over this part and tried a few other methods instead, I still think this works well...and is more straightforward.
But, first things first...
MEASUREMENTS!!
It took me a long long long time to get into the habit of measuring mirror image sections of a garment, to make sure they were exactly the same.
I can't tell you how many times I finished something only to find that one side was slightly (but noticeably) different from the other side....I often found that I got so caught up the the minutiae of construction that I forgot to look at the big picture.
and of course, in the front section of a tailored jacket, a roll line half an inch lower on one side or a left pattern piece an inch wider is really important as it will completely alter the look of a finished jacket...
So, before we go any further, lay your two front panels side by side and spend some time comparing them..
(Of course, if you have altered your pattern to account for a higher shoulder etc do take this into account!!)
Check that the roll lines on left and right are the exact same length, that they start and finish in the same place, the collar sections are at the same angle , that your taped front panels are exactly the same length..compare every single angle and line...trust me its worth it!
Make any adjustments now, before going any further....my roll line was 1/2" longer on the left and the collar length on the right was 1/4" longer... its so easily done (and so much easier to fix here rather than later) and although it seems like such a minor amount it can make a huge difference...
COLLAR CONSTRUCTION
Before we begin to pad stitch we need to join the two collar back seams - so they becomes one single collar piece for pad stitching.
It will mean that the next couple of stages will become a little more awkward as there is more fabric to maneuver but the collar does need to be treated as an individual piece from now on, so that it behaves as such.
Pin your two back seams, lining up the edges very carefully, and fold your hair canvas out of the way..
(as you can see from the angle of my stripes, this section is on full bias...so don't pull or distort the seam when pinning..)
When sewn, press well with steam and a press cloth to help the seam lie as flat as possible...try to leave at least 1/2" of allowance..this will help with fraying and reduce obvious seam ridges.
and then join your hair canvas edges to meet above the seam...
If this were a regular under collar, your two pieces of hair canvas would have been joined in the middle before being sewn to fabric with a zig zag stitch to reduce seam bulk and to help keep them flexible, but because our pieces are already attached to our fabric we are unable to do that, so a small amount of hand stitching is necessary..
The feather/baseball stitch
It's the perfect stitch for joining two fabrics and keep them flat..
This really helps the two pieces to lie flat, even if its not pretty to look at!
(You might find like mine, that you have to alter your stitch length in places to account for fraying fabric..)
PAD STITCHING
Pad stitching is one of those mysterious sewing techniques that always sounded really complicated, but turned out to be nothing more than a simple stitch.
Its an incredibly clever technique though, as not only does it join fabrics together invisibly, but it can also be used to shape and control the direction of a garment...
and thats exactly what we will be using it for today on our collar.
As I mentioned earlier, I want my collar to stay upright and have a gentle curve on the front and in order for that to happen properly, I need to plan before I start, just how to use my stitch to manipulate the fabric ...
but I'm sure some of you will want to wear your collar down - so I've put together four suggestions below.
I do want to mention though, that these are only my suggestions, I am no expert.. Read any tailoring book, blog, or website and opinions will vary vastly on how to pad stitch/shape a garment... There are hundreds of ways to do this, and your decision should be based on how you think your fabric will behave..and what you would like your finished garment to look like.
Hopefully, this will help explain the concept..
1) This is the collar guide that I have used, the pink lines show the direction of my pad stitching at the corners, the angle is to help force a harder curve , I am also altering the direction at the very ends again to help weigh them down even further. The blue lines will keep the collar upright and also help it to mold around my neck.. ... for a softer collar sew wider spaced lines - stiffer collar closer together.
2) Here, we are curving the ends as above (pink) but making the back collar softer so it could fold easily and lay flat. The shorter the distance between those lines - the more supported it will be.
3) and here, the ends will subtly curve as there is less weight on the corners, and the collar will lay flat as above.... If you want an even softer collar, spread the blue lines out more..
4) This is a more traditional collar, I have added a stand (yellow) that would be sewn with a row of pad stitches to help define it, inside this area are more tiny pad stitches which will help keep this area stable. I've kept the collar very soft by keeping the lines parallel with no angles (again, spaced closer or further apart will affect the stability)
The stand can also be made wider to encourage a specific fold of the collar...
A pad stitch length can be anything from mm's to 3/4" or more, it will depend on how much weight and stability you wish to bring to a specific area.
(My stitches are all approx 4 mm and the very corner section was approx 2mm's)
HOW TO PAD STITCH
As always, there are a couple of rules!
1) Your fabric must stay still, if your collar top is facing towards you when you start your first stitch, it must remain facing towards you until your last stitch.
2) Your needle moves across or up a row, and then back down the next row in the opposite direction, creating a herringbone pattern.
3) A single thread of knotted cotton or silk is best, plus beeswax if preferred.
4) Placing a hand of support under the area that you are padding, will encourage the area to fold due to the heat from your body on the wool - that was a total happy geek moment for me...so cool!!
Above, you can see my different chalk lines, spaced very close together for maximum effect, the yellow lines were eventually replaced by the blue ones after some trial samples as shown above in 1)...
As I want my collar tip to curve, I have my left hand placed under the curve as I sew...your needle should always be inserted horizontally (apart from my hand lifting this edge, the remainder of the jacket stays in place)
(I added a quick drawn stand here in pink, in case anyone was interested in seeing one)
and of course while this takes a while, you soon get into the rhythm.... and its very relaxing!!
A quick demo video is here
This is a good tailoring video to watch, it covers a variety of stitches , pad stitching is shown at about 10.30 mins...
Mel did a nice post here on pad stitching
and another here from the Great coat sew along (2008)
HOW TO MACHINE PAD STITCH
Before we begin, don't forget all the machine pad stitching will be seen on this collar. Normally the wrong side would be folded to face down but here, as the collar stands upright, you will have to use it as more of a design feature...
Follow the custom method above, mark chalk lines on the hair canvas accordingly. Don't forget, the closer your lines and stitch length, the heavier and firmer your collar will become (you will have two thread's - bobbin and top - and more evenly spaced stitching, it will weigh more)
Before you begin to stitch, it might be worth reading through the quilting post from the LFJ to help with your tension and stitch length.
When you sew, backstitch in the seam allowance and keep your lines evenly spaced...
You can see a quick peek of what it will look like here in this preview video.
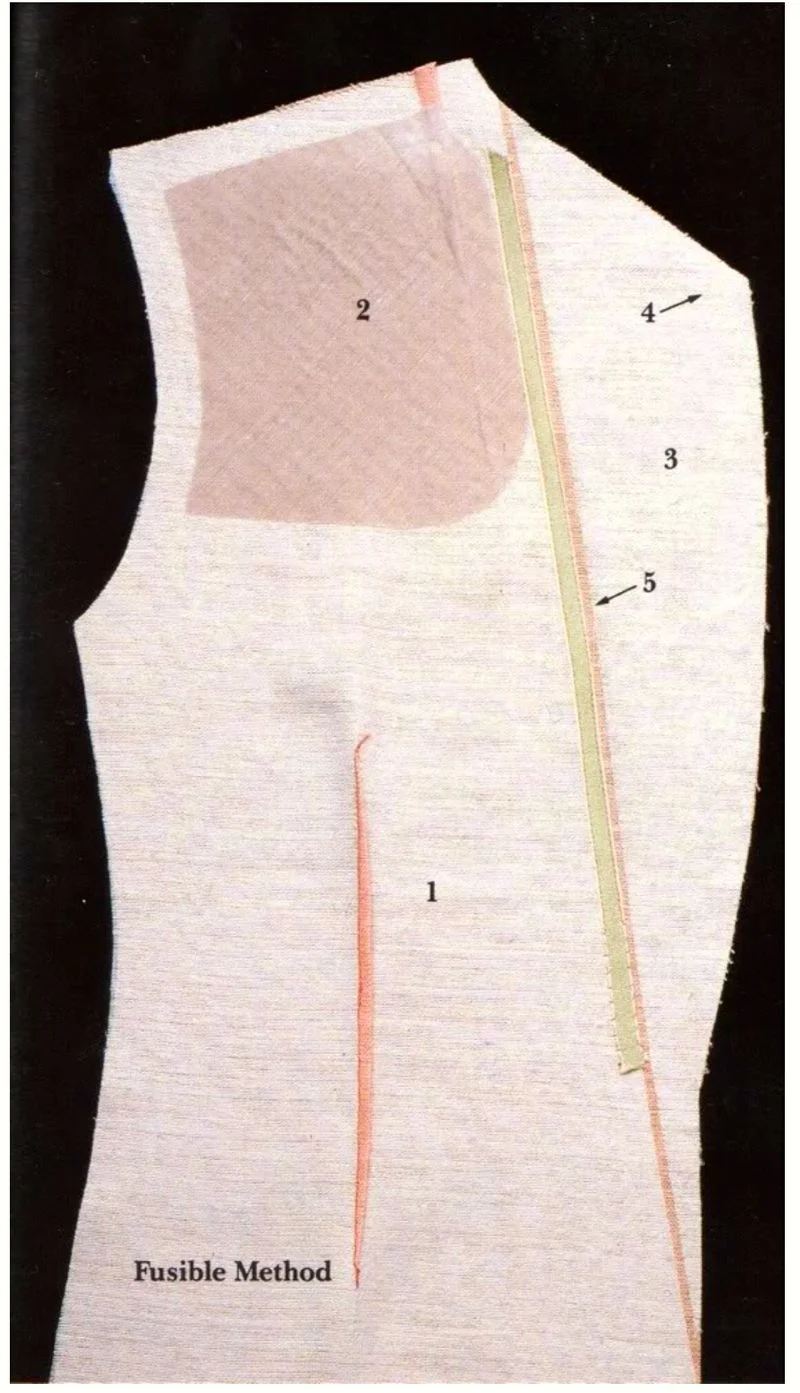
FUSIBLE ALTERNATIVE
If you are using fusible , and you would like to have your collar roll a little more, or curve towards the ends in a more obvious way ....it is possible to add little sections of extra fusible to mimic a pad stitched section and help it weigh a little more..
Either by cutting out triangles to fuse to the corners or a stand for the collar base... if your fusible is light to medium weight, use pinking shears to cut your additional pieces in order to reduce ridge build up..
It is traditional here once your collar is finished to steam and press your roll line, letting it sit overnight to set into its final shape...but I would suggest waiting in this instance until the jacket can be tried on..
and I can't stress enough that this collar section is a step to take slowly.......keep pinning the muslin together to remind yourself of the finished shape (I've done it repeatedly!) and make plenty of samples to get used to the stitches and technique..... theres no deadline!!! :-)
Next week, lets get our jackets together...sides, backs and sleeves..
The following week we can wrap this up with hems, pockets, linings and trim....
and of course if anyone has links to share or suggestions to make, send them my way. These posts are so much better when they are a collaboration.
Any questions? Hellochallengingsew@gmail.com (envelope icon at top right) or leave a comment :-)
Enjoy your evening!
Leisa