Marfy 0757 free skirt sew along P5A - sewing with Guipure and Neoprene...otherwise known as one extreme to the other!
These are the last two posts for the skirt sew along, I thought I would just cover some basic options but if you'd like something more specific, leave me a comment and I'll see what I can do...
I've split this post as its huge - 5A will be about fabric and 5B will focus on pattern alteration.
A) Guipure lace
A) Neoprene
B) Darts to princess seams
B) Waist facing to waistband
GUIPURE LACE - pronounced GI-pyoor
I've sewn with lots of laces in the last few years but I find myself always gravitating back to guipure....there is something so substantial and wearable about it.
I tend to think of it as a day to day fabric, as opposed to a special occasion fabric....something that can be worn often, its heavy, thick and visually interesting, available in lots of colours and various designs....and as an extra bonus, the cost per yard is usually far more reasonable than other more delicate laces.
So, of course when I was in B & J a few weeks ago and saw this very unusual grey guipure for $62 per yard.... I bought it immediately. I have never seen a grey quite like this and felt it would work with so many different coloured under layers.
(and this pattern is perfect for lace as its a very simple design. The fewer seams and darts you have on a lace skirt the better)...
SEWING WITH GUIPURE
Its all about foundations with guipure.......you have to plan for the weight accordingly.....its heavy, but stable and it needs something strong to support it.
A guipure skirt will not only need a silk or similar under layer to compliment the lace but also a underlining to support the two......so in total, my skirt has three basic layers and a lining.
In essence, you are making a wearable skirt consisting of a underlining and , with the lace overlaid on top, almost as an embellishment.
For my underlining, I choose a heavy muslin, its thick but soft, and will move well with the silk double faced charmeuse that became the under layer.
I cut out my muslin with large seams allowances and used them as the pattern to cut my charmeuse....once the two were cut I joined them by thread tracing and used carbon paper to mark the darts, slits and zipper placement on the muslin underlining.
More info here from my LFJ post about thread tracing, muslins etc
and sewed and pressed the darts in place.
CUTTING LAYOUT
To keep the lace running in a continuous line, sew one side seam closed now. You will pin the lace to the double flat panel.
and before you start cutting...Its always best to lay lace out on a large flat service, and take a really good long look at the design....does it have a scalloped or feature hem? a large central pattern and smaller surrounding detail? a graduating pattern??
*As there is no grain, you have a certain amount of freedom about placement and layout*
You will need to make all your decisions now about placement as you sew lace from the hem up....
My lace has a lovely scalloped hem and a repeating pattern so I knew my only concern was to line up the scallop placement on to the skirt hem..
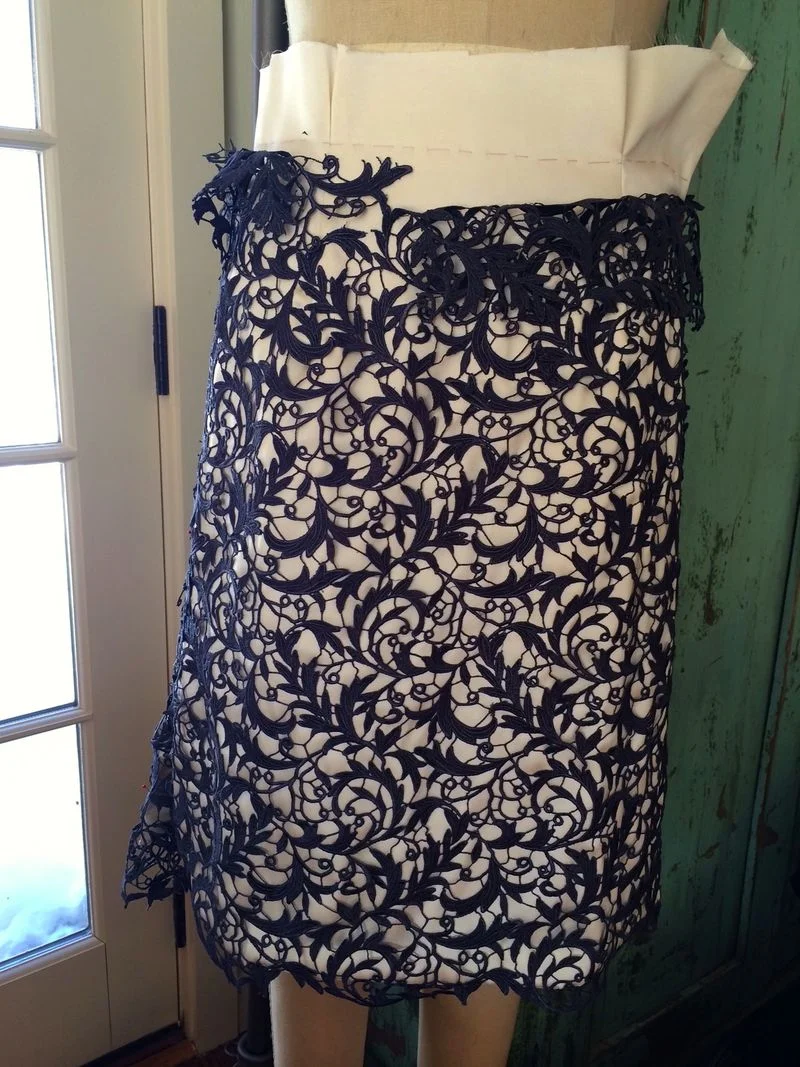
I find the easiest way to do this is to lay your double wide skirt on top of the lace, with the RS of the silk facing the WS of the lace. This helps keep the lace flat and your pinning more accurate.
Its imperative that your hem be exactly how you want it now, as once you start hand stitching, its very hard to adjust anything without removing all the lines of hand stitching....
and pin, pin, pin all three layers together working from the hem up. When you reach the dart area and above just pin loosely to keep the lace stable, it won't lay flat here as the darts will cause distortion.
When you have the rough shape planned out, you can cut the lace using the skirt as a guide.
(Here I often cut my side seams an inch or two wider than the skirt to allow for extra seam matching etc)
and flip that skirt! The lace needs to now face you for the remainder of the project.
I think, sometimes I make sewing an over complicated thing, but here I really like to baste horizontal contrasting thread lines in the skirt.
They act as a guide for my stitching and provide extra stability for the lace while I sew...
I generally start basting two inches above my hem line so the scallops wont't be rigid when I wear it, and then use my basting threads to mark two inches wide lines horizontally from one side seam to the other, right up to where the dart starts.
and although its impossible to follow the lines exactly they are very helpful!
SEWING LACE
A double strand of thread which matches your lace and a super sharp needle are all thats needed here.
I started on my first line above the hem, an inch in from the side seams and stitched through as many thicker pattern pieces as possible all the way along both skirt panels.
The stitch should be tiny and all but invisible from the right side, and don't forget to keep smoothing both the lace and skirt, as bubbles and bumps poking through the lace will be visible when you wear it.
and slowly make your way up to the darted area, this is the fun bit!
There are a couple of ways to shape this portion of the skirt....you can pin your other open seam closed, and run a basting line down to join the two....fit it to your dress form and cut and pin the dart to fit smoothly..
or
you can lay the skirt dart portion over a ham, cut the lace in one straight line down the middle above the dart and pin it back, removing and adding as much as necessary for the whole area to look untouched. Sew each area down from the RS with small stitches.
Either way, the lace and under layer's will need to measure exactly the same to achieve a smooth clean look when you wear it.
The dart line cut and overlapped after cutting a single line above the dart..
Enlarge to spot the dart!
and pieced back together...
When it all looks perfect :-) .... pin your side seam lace excess out of the way and machine stitch the final side seam closed.
and again, start cutting and joining the lace from the two sides together
I ended up cutting away a fairly large portion on one side and folded the other side to run over at the top, so that the lace had no visible seam...
The left side fitted over to the right side for the first six inches and then rejoined the main panel, it gives the illusion of no side seam..
ZIPPERS
I think by now my love of hand sewn all purpose zippers is well known!.... a machine sewn all purpose would also work well here but I am not sure with the thickness of all the layers that an invisible zipper would sit smoothly?
and then its time to start sewing lace back around the zipper.
I cut out a large curved piece to lay over the zipper from left to right as shown above, .and below - pinned back....you do have to be a little careful when doing the skirt up, but it does hide the zipper completely and finish the skirt nicely.
and then did the same for the slit areas....
and don't worry about how the inside looks, mine is like a spider web, a lining will hide all that.
WAISTBAND
There are a few things to decide with a skirt this heavy. A lightly interfaced facing or loose waistband will not keep the skirt on your waist ..... I choose to use a petersham ribbon as a facing because of its strength. It anchors the skirt to my waist, keeping it firm and provides a great foundation for it to hang well.
There is lots of info on this in Pt 4 - here
NEOPRENE
Its hard not to notice the proliferation of neoprene garments appearing on runways and in stores over the last year or so.....and I have to admit I was curious about this fabric.
and as I have made such a lovely delicate lace skirt, it was a nice excuse to go to the other extreme and try it.
(This pattern is a good choice for fabrics like lace and neoprene as it has simple lines and few seams)
I knew nothing about neoprene when I headed into the garment district, but Tony at B&J was incredibly helpful as there were such a surprising amount of colours and widths to choose from.
Neoprene comes in different widths, generally ranging from 1.5mm to 3mm. 1.5mm feels like the equivalent of a home dec super thick cotton and the 3mm like extra thick leather. If you pull it, there is stretch but its not a stretchy fabric....
There are different finishes, I bought the rubber front and back - (this is true neoprene apparently) - but there was also a vast selection of neoprene front and knit back....which eliminates the need for linings.
Don't fold the fabric, it will permanently break down the structure of the rubber and leave creases that cannot be removed. Store it rolled or fold it very loosely, opening it every few days.
It can't be ironed or pressed, even with a press cloth. It smells....(like rubber of course but yuk!)
Sewing it is a test in patience...everything I've read suggests using a industrial machine, of course a coverstitch machine or overlocker would also work but I really did not want stitching on the outside....
So I experimented. A walking foot was essential, as the rubber stopped a regular foot from sliding along nicely.
A denim or top stitch needle works best, I was sewing with the 1.5mm width and the needle was great.
Expect some missed stitches, regardless of how you set the tension and stitch length...(that's where the industrial machine is useful, I believe) I went back over the seam filling in the gaps.
You can, believe it or not, unpick a row of thread, the rubber just seems to fill the hole back in, although there are some subtle marks left.
The seams can be held with pins.
Allow way more negative ease than you think you will need. Its like wearing spanx, this stuff sucks you in and moulds to your body....
I normally cut a 44, but for this I cut a 38 and left off all seams allowances and it could still have had an inch or so removed without it being to tight.
I sewed it as I would a normal skirt, with 5/8" seam allowance on the inside and regular darts.
I hate and I mean hate the inside seams....they won't lie flat, you feel them when you wear it and they keep the outside from looking crisp. I eventually hand stitched a small stitch on to the seams picking up tiny bits of skirt, it worked but its time consuming.
You can see a pin mark above on the inside, but the fabric front shows nothing...
I think a rubber glue would have been better suited here.
The zipper was easy to install, as you can hand stitch it in....when its being worn, it lie's flat and looks neat..but getting it to look that way when not worn....oy.
Overall, its warm, comfortable and flattering. I imagine it would be the perfect fabric for a structured very architectural jacket...something that does not have as much swishy movement as a skirt!
Leisa