Blouse sew along Pt 5 - Construction, collars and sleeves...
Today, lets talk a little about seams .... you have probably decided after reading Pt 4 which method will work best for your fabric...and had a little practice run or two!
Rather than show each one individually, I thought I would take full advantage of the excellent tutorials already available and link you to some I really liked...
Craftsy's French seam tutorial: here
The Coletterie's French seam tutorial: here
Craftsy's seven seam tutorial: here
Craftsy's four couture stitches: here
Sewaholics turn and sttich here and her whole tutorial list (worth bookmarking) here
A Fashionable stitch - choice of seam finishes here
If anyone has a favorite let me know, I will add it here ....
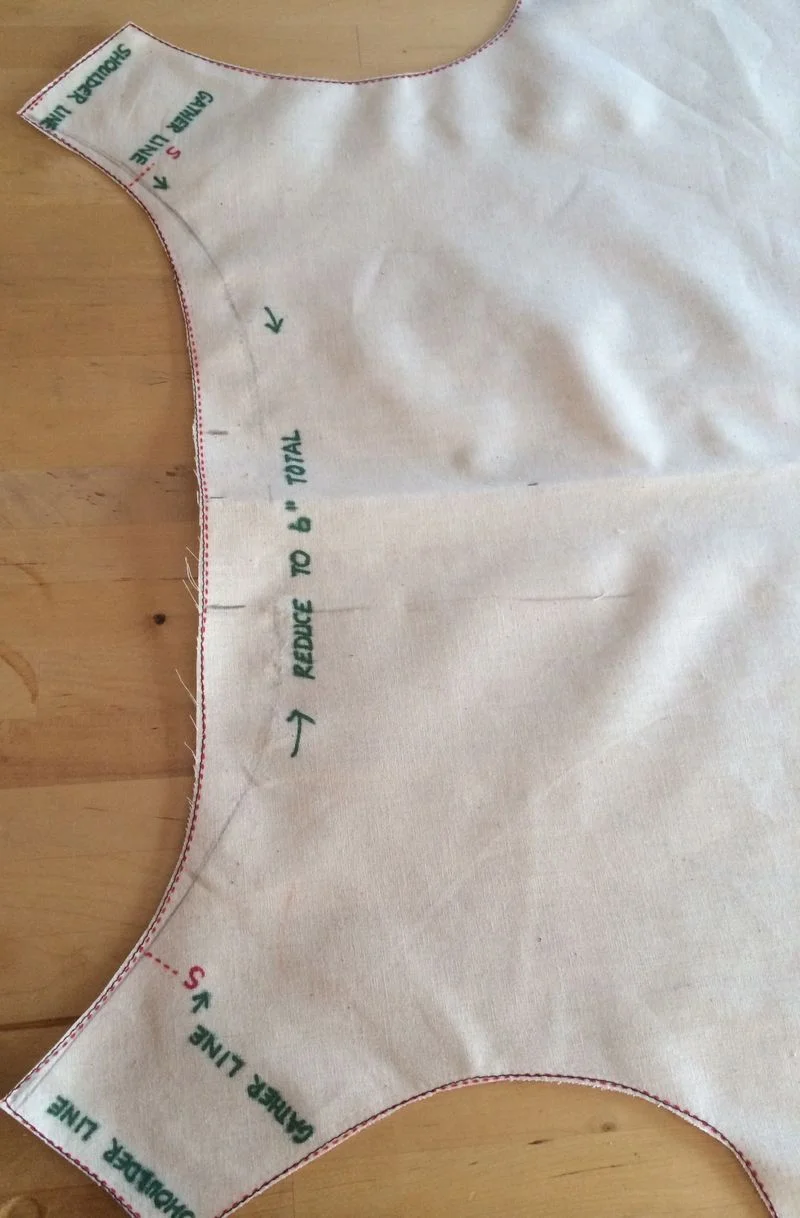
When all your pieces are cut and your gathering and back slash complete, its time to sew up the side and shoulder seams, and as they are straight lines they should be simple, no clipping involved!
A COUPLE OF THOUGHTS - One of the best things I was taught was to always sew from the widest part of your garment to the narrowest...(and I am pretty sure that was a Susan Khalje tip)
There is (obviously :-0 ) more fabric on a wider piece of fabric, so it will be more stable...that section will be held together more firmly, as the fiber is more embedded within itself....the narrower the fabric gets the less is holding it together and the less stable it becomes...
By sewing the widest part first you are building a foundation to support the less stable section because when the stitching is tight and held firm at the wide section, the narrow section cannot be pulled or stretched as far, making it more secure and less prone to wavy and buckled seams.
And another is to always try if possible to sew in the same direction on all seams...seriously it makes a huge difference! A feed dog will always slightly force the wefts up as it sews, if each seam is sewn in a different directions, then the stitching on one side will be slightly up and the other slightly down...again wavy seams!
COLLAR
Your blouse came with two pieces to be cut on fold, so now we can decide whether to underline them or not...
(I want to mention that its a little unusual that both pieces are the same size, normally a under collar would be slightly smaller to allow for turn of cloth , but we can do that ourselves when we get to that stage)
As your collar stands up rather than lays flat and you will be using a lightweight fabric, it will invariably need a little help...and while the neckline and collar seams will do a lot of the foundation support to keep it straight and firm, the fabric itself will remain crisper and sharper with an underlining.
I've tried a couple of underlining methods and my lovely friend Cissie choose a third, shown in the red silk...
If you are using a light to midweight cotton or silk, you might not need any additional support as Cissie's did not... sew a couple of scraps together and see if its firm enough to stand alone..
Below are the collars for the two final blouses I am making, I used a fusible interfacing for one collar and a silk organza for my second so I could compare them..and i've finally moved onto my real fabrics -its good to be back to printed silk!
The upper collar is underlined with a ultralight iron on Pellon fusible. Its so fine that I did not have to remove any seam allowances..
The lower collar is underlined with a silk organza, again its so fine that I left the seam allowances on (if your fabric and underlining are thick they can bulk up the seams, I could reduce that if necessary by removing the seam allowance in the organza once sewn)
and while I prefer the softer look of the organza and the gentler curve on the top seam....honestly its minimal. The iron interfacing stands and feels slightly firmer but not enough for me to recommend one more than another.
If you choose to use organza, cut on grain.. and to sew, place the right side to the right side of the fabric together with the organza on the wrong side of each....no need to baste, its hard to keep control of it all, much easier to use lots of pin to hold it in place..
then stitch the upper collar and sides together stopping about 5/8" or seam allowance from the side seam (sewing the shorter curve, not the longer lower one)
*If you have left your tab length on your collar ends but are not sure if you are use them ... just sew along the upper seam, don't sew the sides yet, we can cut to size and pick stitch closed later*
In a lightweight fabric I like to grade any prominent seams, simply by cutting one slightly shorter than the other, this removes any ridges that might otherwise be noticed on the outside.
Now flip it right side out and mark with a pin which will be your under collar..as we need to turn cloth.
You can again do this a couple of ways - by pressing the seam allowance of the collar slightly over to favor the under side
or by under stitching instead of pressing as Cissie has done. She choose not to underline her collar, leaving the seams and top hand stitching to do the supporting work....the under stitching of a under collar definitely preserves the beautiful gentle curve of the neckline that would be lost by using a iron and gives the whole collar a very couture feel.
If you are pressing, you will need a press cloth as silk can turn shiny quickly...I like steam when I use a press cloth, but I know some sewers prefer to use a dry iron.
Have your undercollar facing you and gently with your fingers pull the slightest amount of the collar seam up and over to press, leaving no seam line visible from the outside of your front collar, you can under stitch by hand here on the under collar if it refuses to cooperate
and the final prep stage:
Mark your seam allowance on the inside of your under collar and press the seam in along the entire length.
When the collar is sewn to the blouse, your inside seam will now be ready for your finishing stitch.
ATTACHING THE COLLAR
There are so many ways to do this, but as this one works well for me I thought I would show it...
To begin, mark the very center, the gathering notch and the shoulder seam with pins on your collar (not under collar)
and using those pins as a guide match your blouse and collar together RS to RS...
adding more pins when everything is lined up...
(your gathering section should be left unpinned for the moment)
Find your basting tails and gather your fabric very gently until there are no clumps or fold's, using a pin or your fingers to distribute it evenly...your collar will be your guide to your gathering length.
When they match exactly pin the rest of your collar and blouse firmly together...
and sew it using one of two methods.
To machine sew, run a 2.5 stitch along the entire blouse starting at your back slash and finishing at the other side, the benefit of this method aside from being easy are very sharp pronounced gathers..(shown before pressing)
I also used a machine to sew my collar on my second version but stopped where the gathering began and started again when the gathering ended. I then handstitched the gathering section using a small backstitch which results in a very soft, far more subtle gathering at the front (shown again before pressing)
Both look lovely but for anyone not using elastic at the hem, the hand gathered version would work fabulously as the gathers are softer and need less help to hang well... the machine sewn gathers almost need to be pulled down at the hem for them to fall properly, the tight uniformed machine stitch is holding them very taunt and out...
When you collar is sewn and pressed, its time to turn your blouse inside out and using your previously folded under collar seam either stitch in the ditch or pick stitch your seam to the neckline....for anyone who has not tried this hand stitch I would highly recommend it, it looks nice and is quick and easy to do.
Its also very hard to see (which is good I guess!) below is the inside of my first muslin blouse with a pick stitched inside collar and end.
and for anyone who has a little extra length at the end of their collar as they could not decide which finish they liked...tab or seams butting up, now is the time to address that..
If you are cutting them down, trim to within 1/2" of your back vent seam, folding that seam allowance inside of the collar, and pinning as you go.
When everything is lined up straight and neat, run a pick stitch down the inside collar to secure... a fell or slipstitch would also work well..
and if you are leaving overlapped tabs, measure both sides out evenly, add a small seam allowance and follow as above....
I prefer to make my collars with extra length regardless of the end design as there is always that one that does not quite match up...this builds in a little insurance should that happen and the handstitch takes no time to do :-)
SLEEVES
To begin, mark your gathering line...its so much easier to sew in basting threads when the surface is flat!
I did this by folding my sleeves in half to find the exact middle and then placed a pin 2" below the pin at the back and 3" below the pin at the front. running two lines of basting threads in this 5" section...
Next I added a french seam
and then sewed it as normal to my blouse, stopping at the gathering start and end points...
This stage is exactly the same as the collar, you can sew the gathers by hand or by machine.
I choose to sew them by hand as I liked how soft the gathers were again - less 80's if you know what I mean! - and then I finished the seam with a hand overcast stitch so I could preserve the softness of the gathering section.
You could use a hairline French seam as shown in Pt 4 or here by Sunni. Just remember to clip around the bends on the second line of stitch...
or serge, or bind or......
So I will be back on Friday to wrap this all up....hems, elastic and armeye finishes....
Let me know if I missed things...or you have a link I can add to a section, the more info the better!
Leisa