Marfy 1913 blouse - free pattern sew along Pt 1
So here we go, Part 1 of the blouse sew along. Its been wonderful reading all your comments and emails, Marfy seems to be quite daunting for lots of sewers so hopefully I can dispel some of that!
This is a lovely straightforward sew, and a really nice way to ease slowly back into January...
Its a fairly big post again , so I have split it into the following sections...
1) My three pattern variations so far...
2) The schedule
3) Supplies
4) Sizing
5) How to use a Marfy pattern
6) Cutting the muslin
7) Putting it together for a first fitting
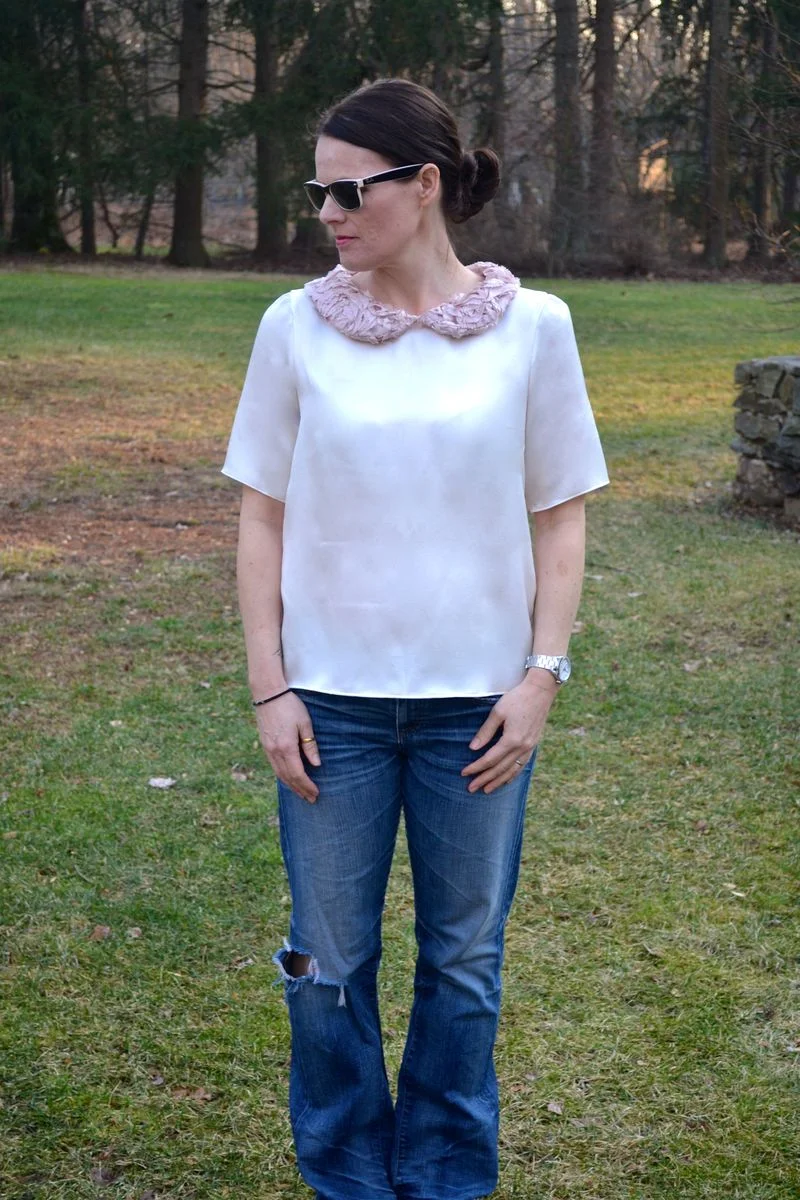
My three wearable test muslin's so far....more to come!
Some more details for anyone interested on Flickr HERE
The original pattern in silk crepe de chine, no adjustments, alterations or elastic at hem. I've now added 2" to the hem and need to add 1" to the back bodice width.
The original pattern in cotton lace, a flat collar lined with organza, sleeves and two inches of additional hem but no elastic - the youngest daughter has already taken this...
THE SCHEDULE
January 13 Pdf, Marfy pattern info, sizing, supplies and muslin
January 15 A) Back slash options and techniques,
B) Pattern suggestions and adjustments for sleeves etc
January 17 Collar prep, collar pattern options and attaching
January 20 Making a master pattern, seam options, cutting fabric & sewing with silk
January 22 Sewing it all together, collars and sleeves..
January 24 Hems, closures and elastic optiions
So hopefully everyone has their pdf printed and all 12 pages are taped together with the X's matching perfectly!
Its always worth checking before you tape that the ruler measurement on the paper is acurate. Apple computers are notorious for altering PDF's. If you do have a issue, try reprinting it using Adobe.
SIZING
For anyone not used to sewing with European patterns, its worth mentioning that the ease included is minimal compared to the big 4.
Marfy patterns are designed to flatter and skim the body, and while there is always more than enough ease for movement and comfort, you will need to plan accordingly if you prefer more.
So how do you pick your size? There are many options depending on your level of experience but I tend to cut based on my bust and hip measurement and alter the remainder of the garment when fitting the muslin...
The Marfys size chart is here for additional help.
(I cut a 44, which fits me well. I am 5' 7" with a 35 bust, 29 waist and 38 hip. I usually only need to add a inch or two to the length and adjust the shoulders as I am broad)
SUPPLIES
Suggested fabrics :- silk charmeuse, crepe de chine or chiffon, cotton voile, lightweight drapey shirting, or a non stretch jersey.
(If you have not worked with silk before , give it a go...I promise to detail every step. Just make sure you buy 100% good quality silk, no habotai or synthetic..they are very very hard to handle, pure silk wth a little weight is easy to work with... promise!)
Approx one yard of fabric if 56" wide or more.
Approx one and a half yards of fabric if 44" wide.
Additional half a yard for sleeves
Muslin (test fabric) preferably closely resembling the weight and drape of your fashion fabric.
Carbon paper (one piece will last a long long long time :-) Resources below
Pattern paper, butchers/construction of similar for pattern alterations.
All purpose thread.
Chalk for temporary marking.
Glass head or silk pins.
MARFY PATTERNS
Marfy patterns were designed for dress makers, design schools and experienced home sewers. They definitely take some practice but once you are familiar with their methods they come together beautifully. More info here
Every seam, design line, dart and gather affects another part of the pattern, so when you change one thing, it alters the whole garment. Because of this a muslin is essential.
and I know there are lots of sewers who hate muslins, but once you get into the habit you will never sew without one again....think of them as stage 1, rather than a extra step. They will guarantee you a garment you will love rather than like....
Its also your opportunity to understand the pattern before you cut your fashion fabric . You can play around with the construction order, perfect your fit , change gathering amount, move darts, alter hems, and mess up time and time again!!
I always schedule at least two weeks for every pattern. Three or four days alone for muslin work , and then at least a week or more for the actual garment. That way I don't rush or feel pressured to cut corners, it makes the whole process much more enjoyable.
As there are no instructions it is advisable to make the garment up to the final stages, even when making a muslin. When I first started I would do a basic fitting, cut out my nice fabric and then find right at the end that there was a important step I had missed because I only tested and sewed the main pieces.
Wearable muslin's are also a really nice option , they not only give you a nice casual first version of the garment but also let you really work through construction issues. I find it incredibly useful to sew this way as I tend to find out if I will wear something as much as I think I will...more often than not, I don't :-)
PREPARING YOUR MUSLIN
I always start by pinning the half paper pattern to either my dress form, or by laying it flat on the table and then I begin to make notes based on my first impressions , normally directly to the paper pattern. Where are the darts, pleats, folds? how does the bodice fit, which piece goes over what?
I cross reference as well by using the paper pattern and the illustrations on line and in Marfy's catalogs, this way I miss nothing.
When I have a rough idea of the garment , I cut out my muslin with at least 2" seam allowances to help with my first fitting.
*MARFY DO NOT INCLUDE SEAM ALLOWANCES IN THEIR PATTERNS*
There is also the option of laying your pattern onto pattern paper and adding 5/8".
but for anyone making a first Marfy I would strongly recommend using the larger couture seam allowances, the fit is going to be different than you will be used to and the extra fabric will help you get a better workable pattern.
Its a simple process, but there are a few stages
After pinning your paper pattern to the fabric on the fold, cut big chunky seam allowances roughly all the around and then trace the underside of your muslin with carbon paper...available here here and here by laying it onto the carbon paper.
Remove the paper pattern, replacing the pins in the fabric as you lift the pattern off.
Flip the fabric carefully so that the traced side is now facing you and using those lines, run your tracing wheel over them, creating a carbon copy for the underside.
and using a regular machine stitch, sew over the lines in a contrasting colour . This will let you see the pattern from both sides, feel it for precise matching and give you inches of fabric for a better fit.
and for the moment, just cut a single piece of the collar (not the under collar) on the fold, so that you can check that the width is comfortable and the gathers are sufficient.
SEWING THE MUSLIN
Finding the details:
You will notice from the picture that there are gathers shown but that there are no specific gathering lines marked on the pattern.
Although at first glance, it looks as though the information is missing, ... its not... but you do need to do a little research to find it.
By laying the paper pattern together shoulder seam to shoulder seam, you can see that the notations match up on both the bodice and collar.
The difference between the collar fold and the bodice fold is slightly over 3"
This is the amount that needs to be gathered - remember this is only the half so I will need to gather 6" in total.
Your bodice will then fit into the collar from S to the fold. There are no gathers from S to J.
When you have found your reduction amount, mark the shoulder seam and gathering line notations clearly on both the muslin and the collar. Machine baste two lines between the gathering line S and the center fold on the bodice and pull the threads reducing the bodice amount to fit the collar.
I like to pin the collar on while I do this to make sure that the gathering amount is exact.
When it all fits nicely and the gathers are reasonably even, remove the collar pins, tie off the tails and sew the back side and front side of the bodice together, then the shoulders and finally the collar piece using a large basting stitch.
For the moment, just make a cut down the center back for the back slash. I used a six inch opening from the top directly down but you might need more or less.
If your slash opening is pulling and gaping , you will need to add to the fold on the center back. Make a note and we will adjust that on Wednesday. I added half a inch making an inch in total for V2 and 3 as the back bodice is surprisingly fitted.
When you have made your fitting adjustments, using pins to mark the new lines , run a pencil roughly alongside to mark them.
Lay the pattern piece flat on a surface and square up the lines using a ruler or French curve.
and using your machine run a different colour thread up the new seam lines (mine are orange this time)
When all your fitting adjustments are made, baste your peices together again and try your blouse on...and take lots and lots of pictures. You would be surprised at just how many more fit issues you can see when you are not twisting in front of the mirror!
You are ultimately going for a flattering amount of gathering around the bust and front bodice, a slight billowing at the hem line and a nicely fitted back with little excess...
The armseye should rest comfortably under your arm and angle at the shoulder for a flattering silhouette. The back of the armseye should fall in a gentle curve from shoulder to underarm.
When you are happy with your pattern, remove the basting threads, iron it smooth and cut the new lines following your last machine sewn line of thread.
On Wednesday, we will start the prep and practice for the back slash and talk about sleeve options...
The Flickr should be up and running, if you want to post muslin pics etc for help, maybe someone else will have the same issue you are experiencing...
As always, these posts are a work in progress, so please let me know if I missed something..
Leisa