Sew along Pt 9 - Trim, hooks, sleeve vent, hem, chain and buttons
So this is it, my final sew along post..... and while I am excited to get back to some creative sewing again, I'm going to miss not making a LFJ for while!
Inna and I are both posting today, and next week Inna will do her final post on pockets..
Also I had originally planned to add a quilted skirt tutorial at the end of the month, but I think I will incorporate it into the March skirt sew along instead, so that I can use the free pattern which is more accessible.
HEMMING
My sleeves are now attached, fit correctly and the armseye linings are all sewn, so its time to start the final clean up...
The first step is to attach the hooks and eyes....
There are lots of different size hooks and eyes available in a variety of colours , so what you use is purely personal preference . On the first jacket I made, I used some smaller ones that were 3/8" wide and spaced them evenly apart, and on one of my recent LFJ 's I used 1/2" wide closures and made them a feature.
Above 3/8" and below 1/2"
They both work equally well, and are almost invisible when the jacket is worn. I buy mine from Jo-annes but they are also sold on line at Amazon etc.
and I know that they are hard to find in Australia, so Wendy found me a supplier...thank you!!!
For my pink jacket I went back to the 3/8" and starting one inch down from the neck line pinned them at 3" intervals using six in total. I will usually put the jacket on and then use pins to mark the rough placement. You could space them evenly, in clusters of two or just place a couple at the top....the options are endless!
and it goes without saying that there is a couture method for sewing these on! this technique is also used for hand sewn button holes....
To begin coat your thread in beeswax and iron it using a press cloth, then double up the strand and knot the end...
Feed your needle through the eye..
Pulling the thread until there is only a small loop remaining
and feed your needle back through the loop, pulling it closed, using your fingers if necessary to push it firmly towards the metal.
This will create a small tight knot on the metal loop.
Continue until you have knots sewn evenly throughout both eyes. To finish, run a couple of stitches at the top end so that both ends are secure and tie it off.
(I used a single thread button hole as it was easier to photograph but certainly not pretty to look at!)
LINING AND FELL STITCHING
When your hooks and eyes are secure, trim and fold your lining around the front edge and neckline. Use a small fell stitch to close.
HEMMING
There are a couple of options for hemming, if you want your chain to show, finish and fold your lining right to the end of your hemline. If you do NOT want your chain to show and you have enough to work with, use a jump pleat with the lining, nestling the chain between the folds.
For either method use a loose catch stitch to secure the silk to the wool. Do not pull tightly as you will alter the drape of the hemline if its rigid.
I had a lot of comments about the finish on one of my last jackets, and thought I would mention it again. In Europe it is common for there to be a very subtle lowering at the back of the hem. This has the visual effect of elongating the body....to do this I lay the jacket open on a table, mark between 1 1/2 and 2" at the center of the back and then grade it back up to the original side seams.
Its very very subtle when you wear it, but it works!
SLEEVE VENT
To begin, once the sleeve is sewn, backstitched where the vent starts to reinforce it and turn the sleeve inside out.
Start pinning down your lining on both sides of the seam snipping at the lining above the vent so you can also cover the vent..... (its on the right below) and fell stitch the lining closed.
Turn the jacket right side out and lay the vent on top of the upper sleeve back piece using small double threaded fell stitches to secure - only sew the very top portion - shown below in green.. allowing the side to splay open when worn.
Turn the sleeve inside out again and reinforce the stability of the vent by also adding some small fell stitches where they overlap on the inside as well.
I've undone some of the white stitching so you can see...
TRIM
There are so many options for trim and already so much inspiration on the Pinterest board that I will keep it simple.
I have two favorite stores in NYC, one is M & J trim and the other is Mood, they both have a vast selection and as there is so much to choose from I often find myself buying a replacement trim for a jacket and swapping it out....so its worth remembering that you can change it as often as you want!
If possible when you do shop for trim, take your jacket or a very large swatch with you..so you can lay the trim out and stand back. Boucles tend to be visually overpowering so you might need to layer your trim with ribbon or similar to make it stand out sufficiently.
To sew, start your trim on the side seam of the hem where it is least noticeable and pin the whole jacket out before you begin. Check for flaws and marks before you sew!
Use a double thread to fell stitch both the upper and lower edges through the wool but not to the silk lining. I often keep one hand under the jacket while I stitch.
Use your iron and small darts or folds to manipulate the curves around the neckline. Trim is rarely cut on bias, so it won't naturally curve.
and of course if you prefer, you could sew your trim before you fell stitch your lining especially if you are adding lots of layers. I tend not to do this if my trim is bulky or has beading as its harder to hold with all the extra weight for fell stitching.
CHAIN
This is the part of course that makes every LFJ instantly recognizable!
While you have vast choices in weight and colour for chain always make sure that you use metal. A chain is necessary to make the jacket drape correctly and counter balance the trim and buttons..... a plastic one will not have the heft needed.
Again both Mood and M & J trim have a huge selection, including lots of bright colours!
I am always trying out different sizes and shapes, and I think that a flat chain is far easier to sew and less obtrusive if you can find some and while it is more expensive it certainly looks nice...(middle and bottom chains)
You do not need to buy a chain that feels heavy in order for it to work well, but as you can see from the lower picture a heavier chain can increase the impact and look great!
I replaced the chain I had on my jacket pictured above with the larger chain, and it has not affected the fall or hang of the jacket as it's such a stable thick boucle..
However, for a lighter weight wool a much smaller chain would be more suitable and kinder.
The middle chain pictured above is from Susan Khalje and it is the perfect weight and size for a lighter jacket.
To sew the chain, place it about 1/4 to 1/2" above the hem line and using a loose back stitch sew it in place with beeswaxed double thread. Sewing it to within a 1/2" of the front edge on both sides. You can sew every link or every other depending on your patience! for a heavy chain I will also add a few stitches at the top and bottom every four or five links.
If the chain is to loose it will drag down parts of your hem and look "off" and if its to tight it will gather your hem .....
A good way to check its sewn correctly is to measure the hemline and cut the chain exactly to that length. If your chain overlaps at the front when you finish sewing, its sewn to loose, if you do not have enough when you reach the end, its sewn to tight. It takes some practice to get it just right!
BUTTONS
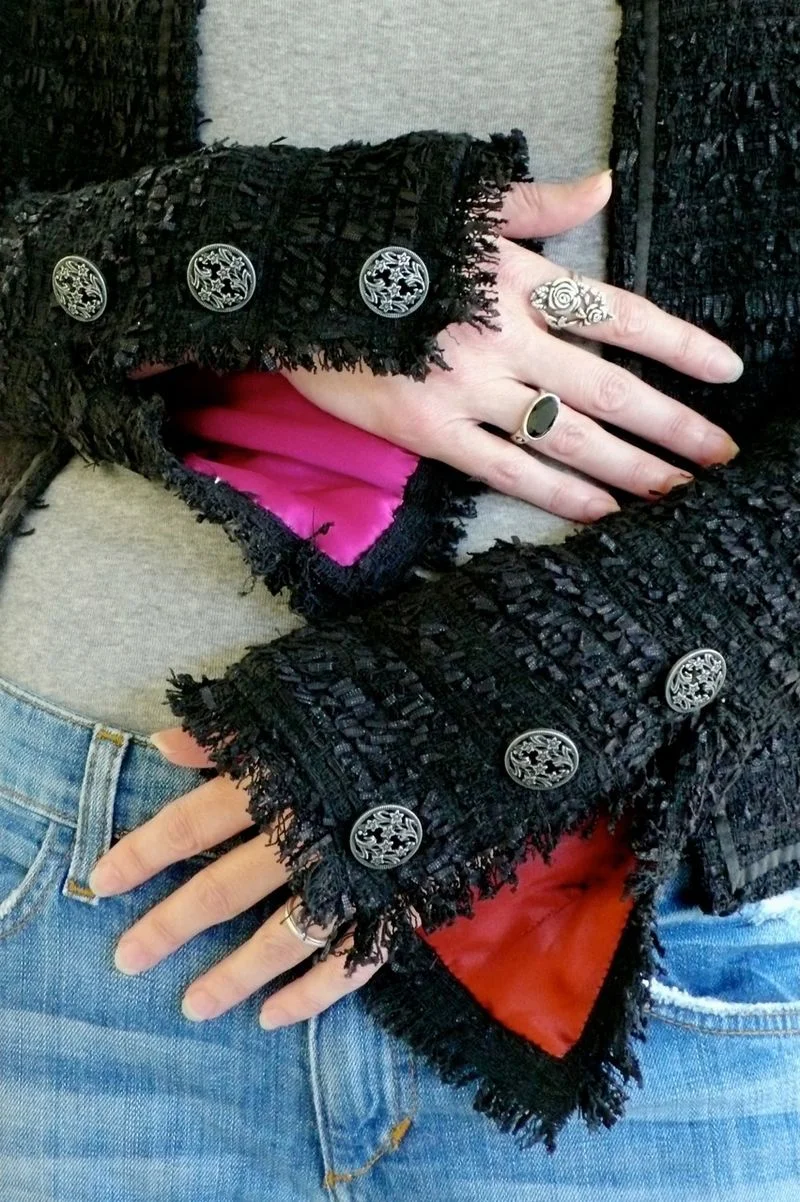
Traceys jacket
and my first....
Buttons can be added to the sleeve vents, pockets and front edges, and while none of them actually function , they do bring a nice finished element to the jacket.
They also keep the weight on the jacket hanging downwards, especially as the sleeves do not normally have chain.
SLEEVE VENT BUTTONS
These are sewn before the lining is fell stitched to the vent. Check that both sleeves are the same length before you start and mark your button placement on one sleeve with pins. Transfer those measurements to the other sleeve and sew each button on using a single strand of waxed buttonhole thread.
POCKETS AND FRONT EDGE BUTTONS
There are a couple of options for the pocket depending on the weight of the button.
If your buttons feels heavy in your hand, there is a chance that they will pull the top of your pocket down and open, distorting it. If this happens then you will have to sew the button through to the inside of the jacket, making a thread shank to allow for the fabric thickness....
However if your fabric can take the weight, sew it on either before closing up the lining or after as you will not see the internal stitching, again using a buttonhole waxed thread.
Another choice would be to forgo the buttons and use either snaps or magnet fastenings instead.
FRONT EDGE BUTTONS
Any buttons used on the front of the jacket should be sewn at least 1/2" away from the trim towards the middle of the jacket using a single thread and avoiding the lining if possible.
Again weight must be taken into consideration as half a dozen heavy buttons will drag the front down and alter the drape.
and thats about it I think!!
Let me know if I missed anything....back next week with some regular sewing, yey!
Have a lovely week.
Leisa