
Sew along Pt 8 - Sleeves, linings and bees wax with a video on the way...
This is it, we have finally reached the sleeves!
Hopefully you have read Inna's post on the fell stitch and your lining is now sewn down in both the bodice and the sleeves.
Your stitches should start and stop about 1" from the ends of the basting threads and about 2" from the hem, so that you still have room to work.
and as this is another huge post.. I have broken it into parts....
1) Shoulder seam preparation
2) Neckline stay stitching
3) Sleeve preparation
4) Sewing the shoulder seams
5) Upper Sleeve insertion
6) Beeswax and stitching
7) Lower sleeve insertion
8) Seam allowances
9) Shoulder pads
10) Sleeve lining and finishing
Also the videos are made, and I will add them in the next few days, but unfortunately my daughter and I need to edit them together ...and our schedules have been all over the place this week...
I will also keep adding pictures and text to each section as I remember things...consider this post a work in progress!
and frustratingly I found that Lila's jacket was not photographing as well as I would have liked, so we made a pink boucle jacket yesterday, which is much easier to show detail with, yey nine jackets for me!!
1) SHOULDER SEAMS
To strengthen the shoulder seam, a strip of organza selvedge should now be basted to both sides of the thread tracing before the shoulders are joined... you will probably have some of your stabilizing organza included in the seam line from the front and back bodice, but here you are using the actual selvedge which will not fray or unravel...
2) NECKLINE
As you insert the sleeves, the fabric around the neckline will be pulled and stretched..in order to stop this from happening, its a good idea to run a small line of machine stay stitching along the thread tracing. Use a smaller than normal stitch size and keep them exactly on or slightly above the sew line. Do not make them so tight that the fabric begins to gather, you just want them to be tight enough to support the shape of the neckline and keep it stable.
3) SLEEVE PREPARATION
So once my selvedge is sewn in and my neckline stable, I like to open my bodice again and trim some of the seams down to a more manageable length...
The yellow tape is laid over my basting threads around the bodice armseye to make them easier to see....
and as all my fitting adjustments have been made, I can now cut away the excess especially under my arms... this will make it much easier when working with the sleeve.
The upper seam's towards the shoulder will become part of your sleeve head. They are normally around 1" wide, so don't cut below that for the moment
and I can also trim the excess of the sleeves.......leaving 1"of seam under the arm and just over 1" above.
and of course now is a good time to identify and mark each sleeve if your labels have disappeared. The front of the sleeve cap will always be slightly higher than the back cap, which is a easy way to make sure you are always sewing the correct sleeve to the correct side! (Front on right, back on far left in picture below)
Its also worth checking that your your notches (or new fitting marks ) are still obvious on both the sleeve and bodice sections....then...
Begin by measuring your armseye AND your sleeve circumference. Generally in commercial patterns there will be a difference of one to two inches. (The sleeve will always be the larger of the two)...this excess has to be reduced in order for it to fit neatly into the jacket.
(although if you are interested, this article about removing the ease completely is fascinating and one I use often)
31Once you have a idea of how much extra fabric you have, its easier to make a decision on how to proceed....there are a few choices for making both pieces the same size...
If my fabric is very bulky, I tend to ease the excess in by hand while pinning the sleeve to the shoulder seam. Simply match notches as closely as possible and then distribute the extra throughout the upper sleeve .....I would not recommend basting lines in a bulky fabric and gathering up the stitches ,it can leave you with a lumpy uneven sleeve cap...
However for a medium weight fabric, its a great choice to just run two or three close lines of large machine basting stitches between the upper notches and pull the bobbin threads gently , reducing the sleeve to the size of the armseye.
When the cap is smooth and evenly distributed, slide the sleeve over your sleeve board and gently steam the cap, allowing it to set and dry before removing.
SEWING THE SHOULDER SEAMS
Now is the time to sew the shoulder seams together with a permanent machine stitch ..make sure the basting threads on each piece match precisely before you sew, it will make the sleeve fitting much easier.
Use a regular stitch and a small back stitch to secure the beginning and end of each seam. When finished lay the seam on either a sleeve board/ ham or similar.... and gently press them flat with a iron and some steam
Again your seams can now be cut down, especially if there is still a lot of fabric...
I had about 1" on the front side of my bodice but almost 2" on the back , so I cut that one down to 1" and steamed them for a final time.
There are a couple of way to insert the sleeves. If you have a thinner fabric and prefer, you can sew them entirely from the inside. It won't give you the exact same look of a couture jacket, but having sewn them this way a couple of times....they do look perfectly fine!
The traditional couture method is to sew them from the outside , starting at the front shoulder join, all the way to the back shoulder join. Everything below that will be sewn from the inside of the jacket.
Once my sleeve is the same size as the armseye and my shoulders are sewn, I like to try my bodice on again, marking with some tape where my arms join my lower body, both front and back. This is the portion that will be sewn from the outside. (Don't forget to pin your linings back before you start!)
Everything above the blue lines will be sewn from the outside, everything below from the inside
There are lots of way to pin a sleeve from the outside, flat on a table with one hand supporting the armseye from the inside, on a dress form or while you wear the jacket if have a great helper....or using a ham or a sleeve board. I've seen it done (and tried) lots of ways and they all yield good results if you take your time, match your notches and ease the wool slowly
I should also mention grainlines again here. Hopefully your basting grainlines are still on your sleeves, and you can see that the cross grain is still parallel to the floor. A twisting sleeve will effect fit and the hang of the entire jacket. If you don't have a grainline on your sleeve, just lay your pattern piece over the top of a front piece and place some pins where the grain begins and ends, its worth the effort!
Its hard to show, but your sleeve seam allowance should be folded under and laid exactly onto your bodice basting threads...pin, pin, pin...
and again when the sleeve is pinned securely, I alwayslike to try it on and check fit before I go further. If the pins are uncomfortable, consider a quick row of basting threads instead. Its very hard to remove a sleeve once its sewn down in permanent stitches so this is a great time to triple check that everything is where it should be.
BEESWAX AND THREAD
I do not use beeswax very often , but when I set in sleeves, sew buttons and my jacket chains I consider it essential ......and I know lots of sewers also love it for pad stitching, quilting, zippers and hems...really anywhere that strength is required.
Beeswax is a must if you are sewing your sleeves from the outside. It strengthens your thread while leaving it soft, thin and flexible.
I've been asked a few times if buttonhole thread would be suitable, and honestly... no!
You can see from the above picture that the lower thread is far thicker than the all purpose thread...
Using beeswax will give your all purpose the strength of the buttonhole without the weight and thickness.
A heavier thread of this width would not be able to" bed" into the boucle, instead it would either sit on top where it could be seen , or it would pull the wool down unevenly...the beauty of these jackets is that smooth sleeve cap.
Beeswax comes in many forms, I bought mine from Susan Khalje but there are many variations available.
Its simple to use...after cutting a length of thread, pull the entire piece slowly through the beeswax ensuring a complete coating, and repeat two or three times....
then using either a press cloth or some non waxed parchment paper, press with a hot iron for a few seconds, letting the beeswax melt and sink into the threads...
Don't iron directly on your ironing board, the wax residue and dye will transfer to the next item you press! The picture below was from a single thread pressing on organza......crazy :-)
Your thread should now feel slightly stiffer, but still pliable and soft enough to sew easily with.
I usually make five or six of these strands at one time when I sew something quite large, to save me having to stop and start..
Once your needle is threaded with a DOUBLE strand and knotted, start at the right hand side of the upper sleeve and sew, using small fell stitches (same as for your lining) pulling them so that they bed tightly into the wool without tugging it.
Keep them as small as possible and as close as you can....you want this sleeve to remain exactly where it is for the life of the jacket.
I've shown this in a slightly bigger less than impressive blue stitch, but hopefully you get the point!
LOWER SLEEVE INSERTION
When you have sewn your upper sleeve from one outer end to the other and securely finished the seam, flip your jacket to the inside.
Using you basting threads as a guide, pin the two layers together. There should be no excess here, all of that should have been distributed evenly on the upper edge of the outside...
and slip the jacket on! I know I over fit, but it has saved me so much stress in unpicking!!
If it feels comfortable and hangs right, then sew the two layers together using a beeswaxed double strand of thread, and a very small tight backstitch.
SEAM ALLOWANCES
The lower half of the armseye and sleeve seams can now be cut down even further than the 1" previously....if you have a very fast unraveling fabric 3/4" will be fine but if its a stable fabric then a 1/2" will be more comfortable.
To secure the seam and stop it unraveling, you should now overcast the area by hand using a double beeswaxed strand again..
Overcasting by hand will make your seam very soft and flexible, and also stop it from fraying...
The upper half of the sleeve seam is treated a little differently...
Locate your shoulder seam and measure down between 2" and 3", depending on how narrow or wide your upper shoulder is...its can be a guestimate, thats fine!
Snip into the seam, allowing the two to separate. Fold the bodice seam towards the bodice and the sleeve seam towards the seam (your internal sleeve head!)
When I have a jacket that needs more lift, I actually fold both seams back towards the sleeve and just split them below the higher sleeve head... Play around with both looks , and if you don't like either , just fold them both towards the bodice, grading one down slightly so they do not form a ridge and overcast them by hand again.
SHOULDER PADS
Due to the nature of the quilting, there is not enough space to add a shoulder pad internally, so these are actually added after the lining is sewn closed and kept externally.
I tend to cover my shoulder pads with a matching lining a matching lining, cut on bias if possible but on grain works just fine and then I attach each one with larger looser stitches in a couple of places, making sure I don't pull the seams or lining of the jacket in the process.
SLEEVE LINING AND FINISHING
This stage gets a little tricky, there is a lot to deal with so its worth building in some quiet time when you tackle this! ( I will add lots of pics tomorrow for this stage, I need a helper and they have all been busy!)
Now that the sleeve is permanently attached, the linings have to be closed and fell stitched.
I've found the easiest way is to pin your sleeve lining out the way and gently start pulling your bodice lining to the sleeve seam, pinning down your lining as you work around the armseye, following the seam as a guide as much as possible.
You will find that there are areas where there is a lot of lining and some where there will be less....its perfectly fine, after all its a hand made jacket :-)
Also your fell stitches will not come all the way up to the sleeve seams as you stopped sewing 1" below last week, so just pin those areas closed for the moment.
Once you have your fabric all pinned along the internal sleeve seam and you are happy that the fabric and lining is not being pulled or stretched (you will see lumps and puckers from the outside) cut the silk down to about 1/2" or less, leaving the pins in place...working above them towards the sleeve.
Now hand baste the lining down, removing pins as you go.
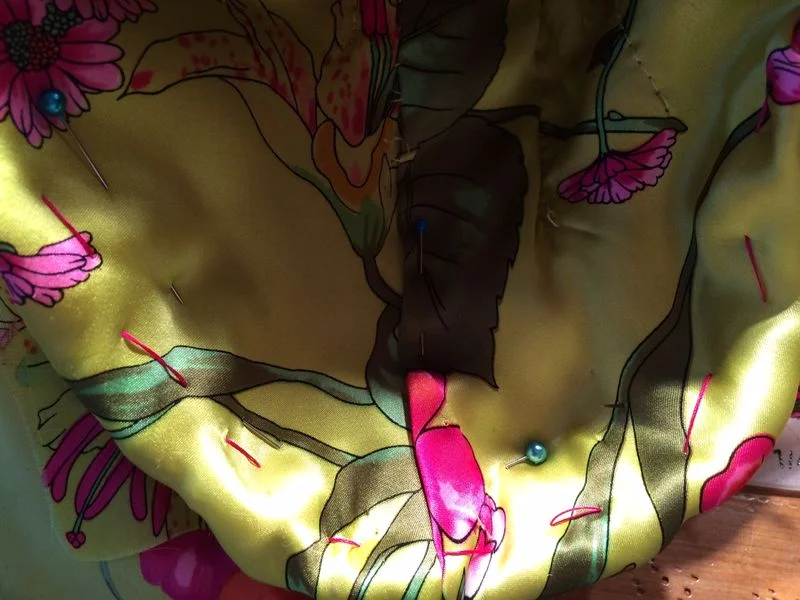
Release the sleeve lining from their pins, and gently start folding and pinning this fabric over your bodice basting threads....trimming your lining down to about 1"...folding a portion under to make a seam so that the edge is finished.
YOUR SLEEVE LINING WILL LAY ON TOP OF YOUR BODICE LINING WITH THE SEAM FACING TOWARDS THE CENTER FRONT OF THE JACKET
Sew the lining down using small single thread fell stitches.
You will find you have to manipulate the lining in places, it will not fit exactly...you might need to tuck or pleat a area, fold a tiny section under another....thats a perk with handsewing, complete control!
and don't forget to finish your last inch of lining seams...using the same small fell stitch as before.
Thats it for now....I will continue to post as I remember info, and of course leave me a comment if you realize something is missing!!!
So next week will be a regular post....the sleeves are on my Marfy so its beginning to get there....and I will be back in two weeks with Inna for a sew along post where we will both talk about pockets, trims and chains...
Happy Thanksgiving to all!
Leisa


