Marfy sew along 1756 Pt 1 - Pattern and muslin prep
This week we will be working on muslins, fitting, and fabric prep .....
So, hopefully everyone has printed their pattern and now have it assembled but if not, click here to log into the Marfy site.
Once your pattern is taped, it should look just like the one below which will be included in your print out....don't forget to check the scale guide before you cut to make sure it printed correctly!
If this is your first Marfy pattern and you are not sure what size to cut, click here for the size chart .
The jacket is designed to be quite fitted, and while it should skim and flatter, it should not hug tight to your body, its definitely got the look of a cardigan or little French jacket rather than a blazer .....
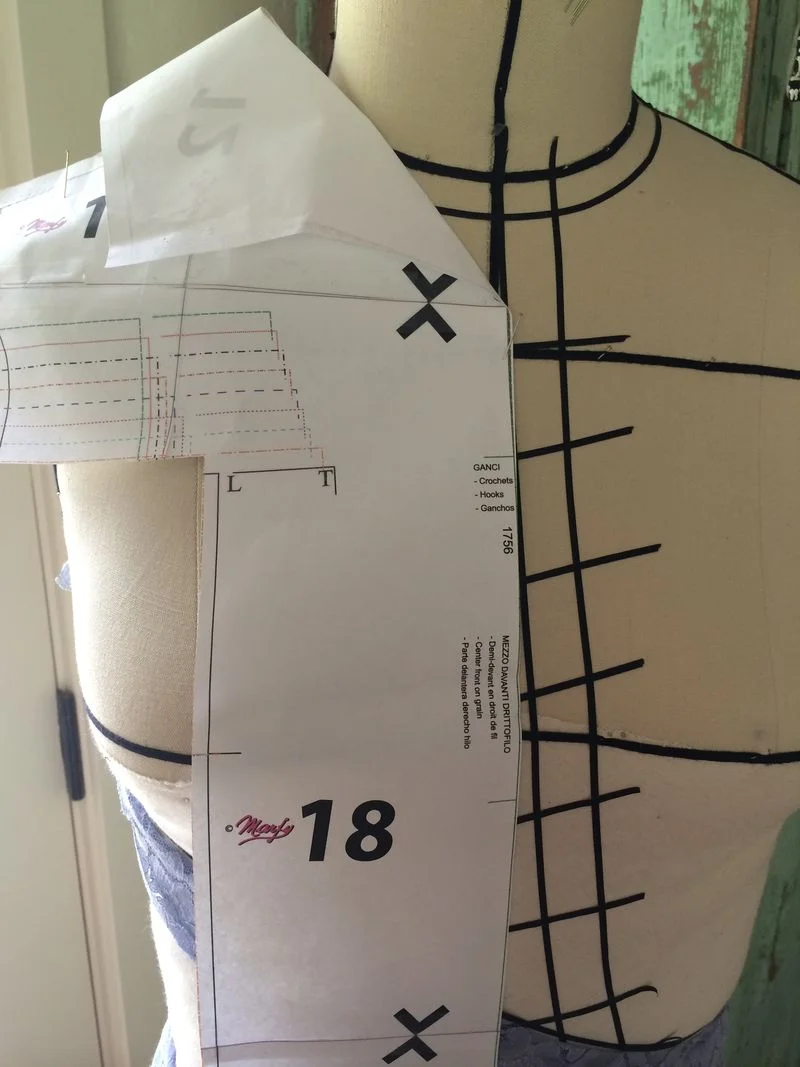
When your pattern is cut, the first thing you will notice is that the front bodice and facing are an unusual shape, and that there are no separate collar pieces.
*also don't forget that Marfy do not include seam allowances so it will look smaller than you are used to seeing as this is the finished size! *
As you can see above, the collar is connected to the upper front piece. There is a second smaller front bodice piece that makes the complete front and a nice tricky corner to master!
The facing (to the far right) is not as wide as the main bodice piece but has the same size collar, this will join the outer edge as shown below...
SLEEVES
I've put these in a separate post...... click here for Sleeves Pt 2
MAKING A MUSLIN
A muslin is a must, I think eventually most sewers come to this conclusion......I know they take time and effort but its SO worth every minute spent.
You get to really fit the garment from the start, reduce surprises as you go along and with a Marfy work out exactly what is going on.
They are a great habit to get into, especially when your fabrics are expensive or you don't normally fit a pattern without adjustment.
Also, as they have all your notches, marks and matches clearly written on them, they are easier to fit as you can spot mistakes and errors quickly as you wear and fit the garment on you.
and when you have a good fitting muslin, that becomes your new permanent pattern which is so much more durable than taped paper .......
If you like to sew with a standard seam allowance, now is the time to lay your pattern onto some pattern paper or similar and add your preferred seam to the original pieces.
If you are planning to make a couture muslin (these are the best I swear!) then you will begin by laying your pieces right side up on the muslin.
There are a few benefits to a couture muslin, but for me one of the biggest is the larger seam allowances...they build in a lot of extra fit adjustment room so you can experiment more...
MAKING A COUTURE MUSLIN
Line up your grain lines and selvedge and pin well as you would for a normal pattern. Cut out your muslin leaving large rough seams of at least 1" - 2". These will become your fitting seams. (the picture is from a older pattern, not this jacket)
If you have carbon paper (scroll down on link) you can now trace around the pieces before removing them. If you do not have carbon ....a pencil will work beautifully. Just mark all the way around the pattern and note your grain line above and below the paper for now. (When you remove your pattern piece just join the two lines with a ruler and mark the grain line down the full length of the muslin)
You now have pattern lines on one side of the muslin, but we need to get them on both sides. Not only will this make fitting much easier because you see the lines clearer and feel them for a guide as you pin but it will also preserve them from smudging or fading.
and the simplest way to do this is to machine sew a line of stitching over the marked line you have just made.
To begin, remove your pattern piece from the muslin, and mark clearly what the pattern number is, the size, all notches and markings as well as the piece name.....
Sew 1" above the starting line and 1" below.....and do the same with the joining lines, the junction you create shows exactly where the fit lines start and finish.....and helps you be incredibly accurate as you join the muslin together.
Here, I will also mark my grain lines with some machine stitching if I know I have a lot of fitting issues, that way when I am fitting myself, I can see instantly if I am pulling and twisting sections off grain ..its a neat trick and its saved me time and time again from distorting my garment before adjusting.
So that's the right side of the pattern made, ......to make the left repeat exactly what we did above but have your pattern pieces facing down on the muslin.
Sew your stitching lines again, and mark all your match points as marked on the Marfy original pattern using a pen (as shown above with E)
PUTTING THE MUSLIN TOGETHER
As this is a fit muslin, you will want to use a basting stitch of 4.0 or larger to join the pieces, it's much easier to remove large stitches as you begin to fit. Do not back stitch at the beginning or end.
I tried a few ways of construction as the collar is slightly tricky but came to the conclusion that the one below is the most logical. Of course, you should play around and experiment...what works for me certainly won't for everyone!
CONSTRUCTION ORDER
Sew your front main panel to your front small panel matching L and L together. (We will go deeply into corner methods for the fashion fabric but for now just stitch and snip to get it laying reasonably well.)
Sew your front side panel to the main front panel matching D to D.
Sew your main back panel to the side panel matching N to N.
and repeat for the opposite side.
*You will at this point have only your facing remaining, put that to one side for the moment*
Now sew your back collar pieces together (marked center back seam) and press that seam flat.
Flip your front pieces so the right side meets the right side of the back bodice and pin the back seam line together, matching those sewn thread lines until the two lie smooth and flat.
Sew the entire length of the collar portion to the back bodice.
Sew your short facing collar seams together as above, press open and then pin the right side of the facing to the right side of the bodice.
*Normally we would not fit the facing in a muslin, but as its a unusual pattern peice its best to have it 'click" now while you can play around! *
Your muslin should now resemble mine, but will probably look much neater :-)
You can now add either the single or altered sleeve. While you don't need to fit with both sleeves, do make sure at least one is attached as it will affect the way your jacket hangs off your body and fits ultimately.
FITTING
Before you make any alterations to your muslin, pin your front panels together while you are wearing it, exactly on the stitch lines effectively closing the jacket as you would on a finished garment.
*Marfy suggest hooks for their closures, so don't overlap the stitch lines they should just "rest" together. If you want to change the closures to buttons etc, this can be done after the basic pattern is fitted and graded correctly*
Recently, Marfy very kindly sent me a PDF showing how to change and adjust their pattern...as shown below.
For a more comprehensive fit analysis and specific issues, my favorite all time book is Fitting and pattern alteration...I use it often and have learnt so much from it, its also a book Susan Khalje highly recommends. Its expensive but its more than earned its keep!
To begin, have someone take lots and lots and lots of pictures of you wearing your muslin, and then take lots more!
Looking in a mirror twisting and turning to see the sides and back distort your garment and completely alter the way it hangs....
When you start to identify areas that are not fitting well...work slowly through them. One alteration at a time, each adjustment can change various areas on the whole garment, so don't make more than one at once...
I was taught to work down, so for me the first place I adjust is my shoulders. I have someone pin a line where they should be or I pin small sections myself and then I remove the muslin.
I then run a different color pen mark along the pins, remove them and rip out the stitching. Sew a new line using the pencil (or pen) marks as your guide.
Try the garment on again, closing up the front...next is the bust. Here you have some nice seam lines to play around with. If you need more room because your bust area is looking squashed, open up that horizontal seam while you are wearing it, and experiment with the amount of fabric you need to release. Pin and pencil mark....
Side seams are next and finally the back....always, always check those grainlines as you fit each section and make sure they are still straight from top to bottom. If you find a panel is "off" grain, remove the panel completely and re-fit it. Your finished jacket will never hang correctly if they do not stay true now, you will always be pulling or tugging a twisting panel....trust me that's a lesson I learnt the hard way!!!!
Don't forget this is only a first fit, fashion fabric will behave differently from the muslin so you might be tweaking and adjusting things slightly again later on...but get it as close as you can for now :-)
When you are happy with the fit, remove the stitching from every panel so they become separate pieces again and iron each one flat.
Mark all the new fit lines marked in a different colour and cut off the excess seam fabric so that all that remains is the finished garment pattern without seam allowances.
and if you are making your jacket with standard seams its time to adjust your allowances to reflect any new fit lines.
I'll add a few more pictures tomorrow of the muslin construction, I'm having issues downloading them, and its late, i'm tired .....and draping class starts bright and early :-)
I'll be back on Thursday to talk about pre-treating fabrics and supplies...which underlinings to choose and pad stitching options...
Any questions? just leave a comment or send me a email to Hellochallengingsew@gmail.com, (or click the envelope icon on the top right of the page) Class finishes at 6.30 each day...
Also, I will post as many pics of the class as I can get away with up on Instagram all week for anyone interested!
Leisa