Marfy 0757 V3- princess & quilted with tutorial...more Marfy pics and a new project!
I spent all of last week, thinking we should have started the Little French Jacket sew along by making this skirt.
It incorporates every single technique you would use in a LFJ but in a far simpler pattern. No arms eyes, sleeves, or trim...just six panels of straight lines, and a zipper or two.... a practice run, if you will and a gorgeous garment at the end.
This beautiful boucle was a gift from Alice of Mendel Goldberg - thank you again Alice!! - and it was such an absolute pleasure to sew. (The link takes you to Karen's blog fifty dresses....she has a lovely write up and pics of Alice and the store etc, but also her blog is incredibly good)
When Alice suggested this fabric, I knew it would work perfectly. Its such a vibrant, interesting wool with lots of texture for quilting and warmth for winter....also even more surprising - it's reversible which I had never seen in a boucle before.
The fabric is actually cut in panels - each panel is approx 60" wide and just over a yard long. One side has a distinct fuchsia thread running through and a grey border at each end....the flip side has a more muted multi grey pattern and the fuchsia border at the ends....
and as Alice pointed out, its one of those fabrics that could potentially match with everything, as there are an extraordinary amount of colours weaved in.
I decided I wanted a pop of colour to compliment a black base...and as I could not bear the thought of those gorgeous thick pink threads being hidden, the bright side it was!
and as an added bonus, the grey border was perfect to use as the hem, I think visually it gives the skirt such a clean neat finish.
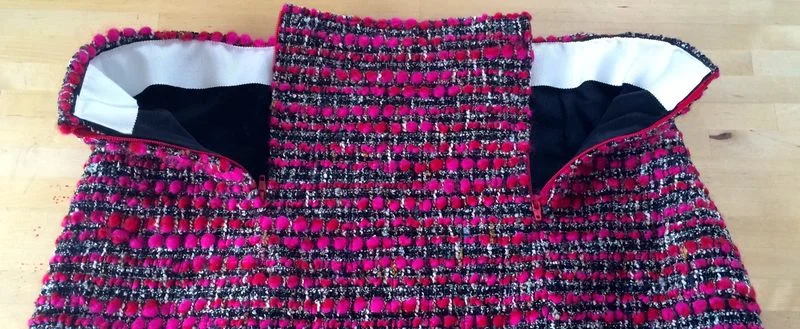
I had a bit of fun with this skirt, and used the princess seams at the back to insert two zippers and make two slits, and then faced it with a bright white Petersham ribbon....as I think many people - myself included - think of tweed skirts as something your grandmother wore....not anymore I hope!!
Of course, you could insert a simple side zipper and side splits, two exposed zippers and vents, two front zippers and slits....and on and on......!
and one will never be enough once you wear it, pure luxury I swear! ... I'm already planning V2 and 3...4 and 5...
HOW TO MAKE A QUILTED "FRENCH" SKIRT
(As most of the tutorials from the jacket work for the skirt, I will link you to them where appropriate, and I apologise if this feels like the abridged version!.....but....the links have SO much detail included already, it would be a shame not to use them)
I started this skirt with Marfy's free download pdf 0757.....but changed the darts to princess seams. Its a really simple alteration but so necessary for a wool or thick fabric.
Darts would be bulky and impossible to press flat with a boucle...but by changing the darts to princess seams at the front and back you are incorporating the shaping and extra fabric into seams. These can be graded and catch stitched down in a regular lined skirt or hidden and secured by quilting in a little French skirt.
So - if you made a skirt using 0757 and are happy with your fit, there will be almost no perceptible difference when you change the seams, as nothing is added or removed.....
To begin you will need to pick a fabric that can be easily quilted, if this is your first time, I would suggest a thicker boucle or tweed, as they hide quilting stitches and are easier to work with.
and of course, thicker does not mean less flattering to wear!....its minimal I promise and it certainly won't add pounds!!!
There is lots of info here about boucle, tweeds and wools... you will need approx one yard of fabric..depending on width, size of pattern etc
Muslins
For a quilted skirt, you will need to prepare a seamless muslin...shown here and skirt muslin here.
Don't forget when you change your one piece to three, add new grainlines to each panel..
and don't worry to much about a perfect fit here, it should be close of course, but a stiff cotton muslin will behave differently than a wool....it would not be unusual to remove another inch or so eventually to compensate for a more flexible fabric.
And as you can see below, more pattern pieces take up more space.... at 60" wide, my fabric was only just long enough to get them all lined up...I had to make my seam allowances smaller than I like but it works..
Underlinings
I'm going to say probably not necessary, unless your skirt fabric is very loosely woven or thin... read through this before you decide!
Thread tracing
Is there anything better, I swear I could do this all day every day! Links here and here.
(I will add a Suppliers link to the menu above next week, to make it easier to find all these notions)
and while you would not normally thread tracing a lining to the wool, I have shown it that way here so you can see .....as the threads all but disappeared into the boucle.
The blue is the tread tracing...the yellow is my quilting guide.
(The blue threads will only be on your boucle, as you will need to be able to flip your lining to tie off your thread tails)
Lining
There is nothing quite like a nice quality silk charmeuse or crepe de chine for quilting. The luxury it adds, as well as the strength silk offers is worth every $....
Its cool in summer, warm in winter and compliments the wool perfectly.
You will find the link here showing how to lay out your wool to your lining, and prepare for quilting.
As I was quilting my skirt, I cut my lining bigger than my fashion fabric, and while its not always necessary, I personally like to build in extra wherever possible in case of fit adjustments...
Quilting
This is by far, my favorite part. There is something so magical about the lining and fabric becoming one....
Quilting post here...
As shown in the picture above, I like to use thread to mark my quilting lines out. You will be quilting from the boucle side and its very hard to mark this in any useful way, as most wools tend to be lofty and many have busy patterns. The thread lines make a good guide and are easy to follow and easy to remove, even when sewn over!....
and although its hard to see, if you can find the yellow threads in the picture below, you will just see the black quilting stitches and tails.....the black threads sit comfortably on the fabric, but are not pulling it down or floating around..
and below is the final skirt quilting....
Tie off those tails!
Make a nice cup of coffee, find a pin or similar and start pulling the top tails through to join the bottom tail on the inside of both layers... three or four nice knots and cut them off... final section of this post...
Baste the panels together for a first fit
Before you baste your skirt together, pin your linings out of the way, folding them as close to the quilting as possible. You want to stop them from being caught up in the seams as you sew...
Use your machines largest stitch size to baste the skirt together....this will be strong enough to hold the skirt together but easy to remove for alterations.
and when you are happy with the fit, sew it together with a regular stitch length.
Grading your seams and fell stitching your lining
I made a video for this stage in the LFJ sew along, as I think visually it makes so much more sense seeing it done...
but the full text with lots of pics is also HERE
Zippers
I'm just going to go ahead and say it, a hand sewn zipper will be much easier to insert and will look far nicer than a machine sewn one in boucle! A slight lapped finish will give it a very couture finish..
There are lots of links here from the original skirt sew along for a variety of methods..
Pin your lining down..
Your skirt should really be looking like one at this point!
So, now its time to start trimming down your hems and waist linings and pinning them down ready to be fell stitched...
But before you do, lets talk about waist options..
Quilting a non stretch lining to a wool stabilizes the fabric sufficiently in a jacket, but in a skirt, I think additional support is needed at the waist to stop it from stretching over time.
There are a lot of options but an inch wide stay tape sewn to the wrong side of the wool before the lining is stitched down would be great......or an iron on interfacing ....bias tape or Petersham....
Or, you could sew the lining down and then add a Petersham or bias tape as I did, on top....and as its not used to finish the edges it can simply be machine sewn as the last stage.
and thats pretty much it, while it certainly takes a little more time to quilt than line, I think the look and wearability of this skirt is worth the extra effort...
The link to the entire Little French Jacket sew along is HERE, it might be worth a quick read before starting this skirt :-)
Wishing you all a wonderful week...
Leisa


